Beyond the Bowl: Why Quinoa is Your Next Sweet Snack Star
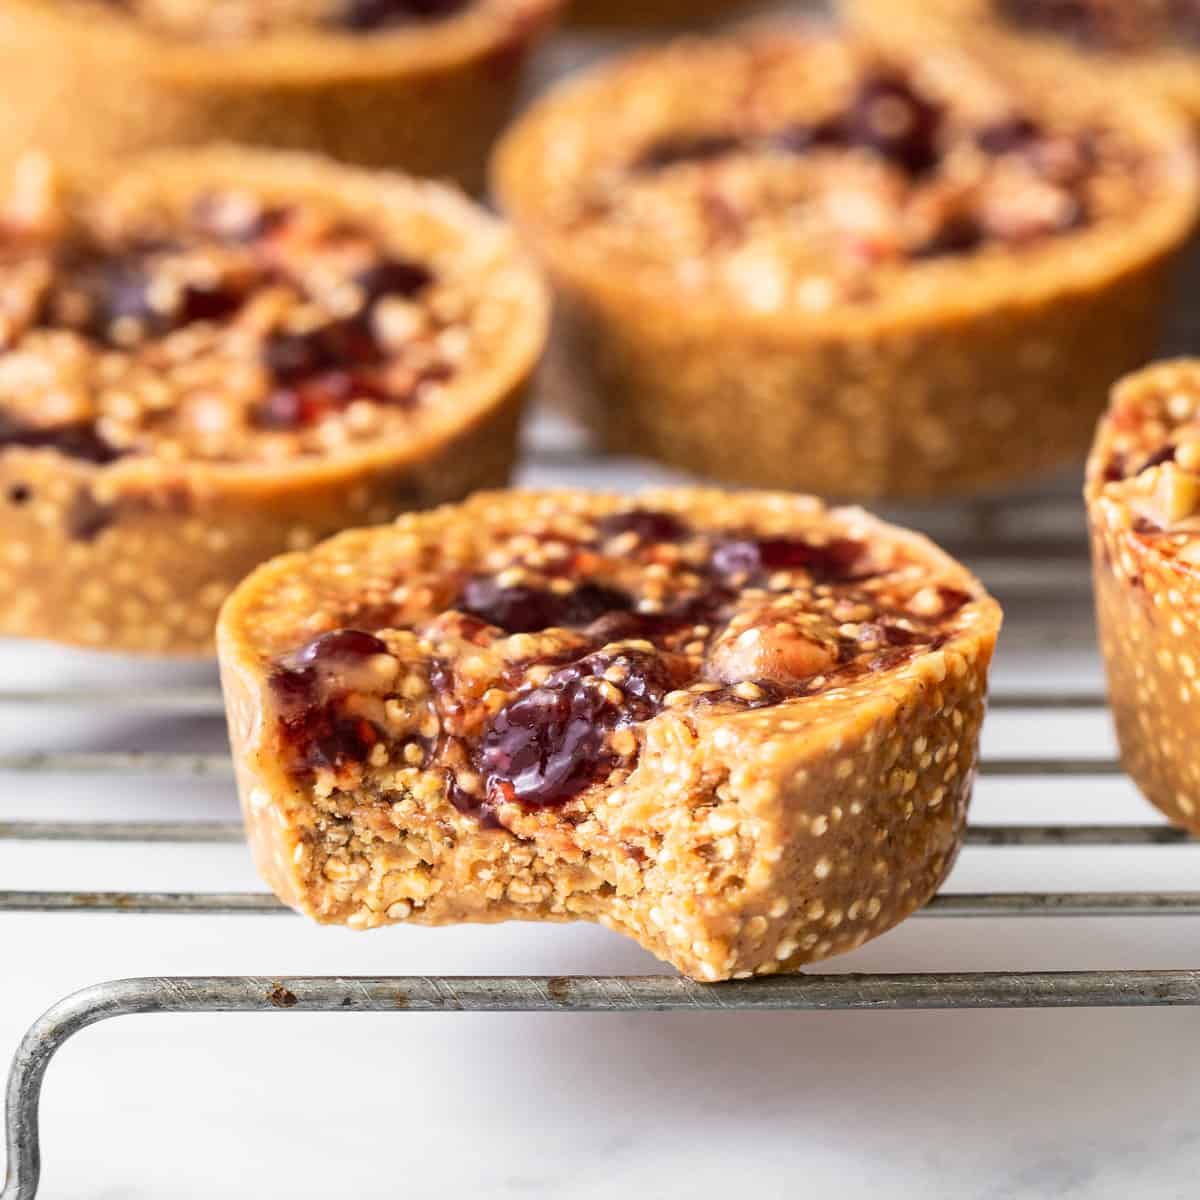
Who says quinoa is only for savory salads and side dishes? Prepare to have your culinary perceptions delightfully redefined! We're diving into the irresistible world of peanut butter and jelly quinoa cups – a no-bake, sweet treat that perfectly marries the nostalgic flavors of PB&J with the satisfying crunch and nutritional goodness of quinoa. This innovative recipe challenges the conventional use of quinoa, transforming it into a versatile star in the realm of easy, healthy desserts and snacks. Imagine a bite-sized delight that encapsulates everything you love about peanut butter and jelly sandwiches, but with an exciting textural twist and a wholesome foundation. These crunchy cups are not just incredibly simple to make; they're also a fantastic way to enjoy a guilt-free indulgence that's packed with flavor, protein, and fiber. Whether you're a busy parent looking for a quick after-school treat, a health-conscious individual craving a satisfying snack, or simply someone who appreciates effortless baking (or rather, *no-baking*), these quinoa cups are poised to become your new go-to. The beauty of this recipe lies in its simplicity and the thoughtful combination of ingredients. Forget turning on the oven; these beauties come together with minimal effort and set perfectly in your refrigerator or freezer. The result is a truly unique snack that boasts a delightful chewiness from the peanut butter and a vibrant burst of fruit from the jelly, all underpinned by the incredible, nutty crunch of toasted quinoa.Crafting the Crunch: Mastering the Toasted Quinoa Base
The secret weapon in these delicious peanut butter and jelly quinoa cups is undoubtedly the toasted quinoa. While you might associate "puffed" quinoa with dramatically expanded, airy grains similar to puffed rice, the reality for homemade versions is a bit different – and just as delicious! When quinoa is toasted properly, it doesn't always double in size or become perfectly round and soft. Instead, it undergoes a subtle, yet significant, transformation, developing a distinct nutty aroma and a satisfying crunch that's akin to a tiny, toasted nut. You'll *hear* it popping gently in the pan, a clear sign it's working its magic. Achieving this perfect crunchy texture is crucial for the overall appeal of these no-bake cups. It provides a fantastic contrast to the creamy peanut butter and smooth jelly, elevating the snack from good to truly extraordinary. Here's how to master the art of toasting quinoa for your cups: 1. Preparation is Key: Start with raw, uncooked white quinoa. While other quinoa colors can be used, white quinoa tends to puff and toast more consistently for this application. 2. Dry Pan, Medium Heat: Place a dry, heavy-bottomed skillet (cast iron or stainless steel works best) over medium heat. Do *not* add any oil. We want to toast, not fry, the quinoa. 3. Add Quinoa in Batches: To avoid overcrowding and ensure even toasting, add the quinoa in small batches – about ¼ to ½ cup at a time, depending on your pan size. Overcrowding will steam the quinoa instead of toasting it. 4. Constant Stirring: This is the most important step! Stir the quinoa continuously with a wooden spoon or spatula. This prevents burning and ensures every grain gets adequately toasted. 5. Listen and Observe: Within a few minutes, you'll start to hear faint popping sounds, similar to tiny popcorn kernels. The quinoa grains will also change in color, becoming a deeper golden-brown. Some grains might visibly puff, but many will simply turn golden and crunchy. 6. Taste Test for Doneness: The ultimate test is taste. Carefully remove a few grains, let them cool for a second, and taste. They should be wonderfully crunchy and nutty, with no raw, hard chewiness. If they're not crunchy, continue toasting and stirring for another minute or so. 7. Remove and Cool: Once toasted, immediately transfer the quinoa to a plate or baking sheet to cool completely. Leaving it in the hot pan will cause it to continue cooking and potentially burn. This simple step is a game-changer, transforming the humble quinoa into a dynamic textural component that makes these peanut butter and jelly quinoa cups truly stand out.The Perfect Blend: Key Ingredients for Irresistible Peanut Butter and Jelly Quinoa Cups
Crafting these delightful no-bake treats relies on a thoughtful selection of ingredients that balance flavor, texture, and nutrition. Each component plays a vital role in creating the ultimate peanut butter and jelly quinoa cups. Let's break down the essential ingredients and explore some tips and potential substitutions: * **1 cup Uncooked White Quinoa:** As discussed, this is the backbone for our crunch. White quinoa is preferred for its milder flavor and consistent toasting properties. Quinoa is a complete protein, meaning it contains all nine essential amino acids, making these cups surprisingly satiating. It's also naturally gluten-free and rich in fiber, magnesium, B vitamins, iron, potassium, calcium, phosphorus, and vitamin E. * **1 cup All-Natural Peanut Butter (Drippy):** The star binder and flavor provider. "All-natural" is key here, as it typically means just peanuts and salt, without added sugars or hydrogenated oils. A drippy consistency is crucial for smooth mixing and easier assembly. If your natural peanut butter is too stiff, you might warm it slightly in the microwave (about 10-15 seconds) to make it more pliable. * Substitution Tip: For nut allergies or different flavor profiles, feel free to use almond butter, cashew butter, or even sunflower seed butter (SunButter). Ensure they are also the "drippy, all-natural" variety for best results. * **¼ cup Melted Coconut Oil (Separated):** This ingredient acts as a crucial setting agent, helping the cups firm up beautifully in the fridge or freezer. The "separated" typically means a small amount might be used for greasing (if not using liners) or to loosen the peanut butter, with the majority for the main mixture. Its healthy fats also contribute to satiety. Ensure it's melted before mixing for even distribution. * **¼ cup Honey:** A natural sweetener that also adds to the binding properties. Its distinct flavor pairs wonderfully with peanut butter. * Substitution Tip: Maple syrup or agave nectar can be used as vegan alternatives, though they might slightly alter the flavor profile. Adjust to taste as needed. * **½ cup Chopped Peanuts (Optional, but Recommended):** For an extra layer of crunch and intense peanut flavor! These can be roasted and unsalted or lightly salted. * Substitution Tip: Chopped almonds, cashews, or even seeds like pumpkin or sunflower seeds can be used for added texture and nutrients. * **12 teaspoons Raspberry or Grape Jam:** The "jelly" component brings that classic sweet and tangy fruit burst. The amount (12 teaspoons) suggests about 1 teaspoon per cup, perfect for a balanced flavor. * Substitution Tip: Any fruit jam or preserve will work! Strawberry, apricot, or even a mixed berry blend would be delicious. For a lower-sugar option, look for fruit spreads with no added sugar. * **1.5 teaspoons Coarse Salt:** Do not skip the salt! It's an unsung hero in sweet recipes. A touch of coarse salt (like sea salt) enhances all the other flavors, cuts through the sweetness, and truly elevates the overall taste profile, making the peanut butter and jelly flavors pop. By understanding the role of each ingredient and being open to smart substitutions, you can tailor these peanut butter and jelly quinoa cups to your dietary needs and taste preferences, ensuring a truly personalized and delicious treat every time.Assemble, Chill, Enjoy: Your Step-by-Step PB&J Quinoa Cup Recipe
Making these peanut butter and jelly quinoa cups is refreshingly straightforward, proving that delicious and nutritious snacks don't require hours in the kitchen. The no-bake aspect makes them perfect for any skill level, and the muffin tin ensures perfect portioning every time. Here's how to bring these crunchy, sweet treats to life:Ingredients You'll Need:
- 1 cup uncooked white quinoa, toasted (as per instructions above)
- 1 cup all-natural peanut butter, drippy
- ¼ cup melted coconut oil, divided (e.g., 1 tbsp for muffin tin prep, rest for mixture)
- ¼ cup honey
- ½ cup chopped peanuts (optional, for extra crunch)
- 12 teaspoons raspberry or grape jam
- 1.5 teaspoons coarse salt
Equipment:
- Large mixing bowl
- 12-cup standard muffin tin
- Paper or silicone muffin liners (highly recommended)
- Spoon or small cookie scoop
Instructions:
- Prepare Your Quinoa: Start by toasting your 1 cup of uncooked white quinoa according to the "Crafting the Crunch" section above. Allow it to cool completely before proceeding. This step is vital for the desired crunchy texture.
- Prep the Muffin Tin: Line your 12-cup muffin tin with paper or silicone liners. If you don't have liners, lightly grease each cavity with a tiny bit of melted coconut oil or a non-stick spray to prevent sticking.
- Combine Wet Ingredients: In a large mixing bowl, combine the drippy all-natural peanut butter, the remaining melted coconut oil, and honey. Stir vigorously until all ingredients are thoroughly combined and the mixture is smooth and uniform.
- Fold in Dry Ingredients: Add the cooled, toasted quinoa and the coarse salt to the wet mixture. If using, fold in the chopped peanuts now as well. Stir until the quinoa and peanuts are evenly distributed throughout the peanut butter mixture. Ensure every grain is coated.
- Form the Base: Divide the mixture evenly among the 12 prepared muffin cups. Using the back of a spoon or your fingers, firmly press the mixture into the bottom of each liner to create a compact base. The firmer you press, the less crumbly your cups will be.
- Add the Jam: Place approximately 1 teaspoon of your chosen jam (raspberry or grape) on top of each pressed quinoa base. Gently spread the jam to cover the base, being careful not to push too hard, especially if the base isn't completely firm yet.
- Chill to Set: Transfer the muffin tin to the refrigerator and chill for at least 1-2 hours, or until the cups are completely firm. For an even quicker set and longer storage, you can place them in the freezer for about 30 minutes initially.
- Remove and Enjoy: Once firm, carefully remove the cups from the muffin tin by lifting the liners. Your delicious peanut butter and jelly quinoa cups are now ready to be enjoyed!
This simple process yields a batch of delightful, crunchy, and satisfying snacks that are perfect for any time of day. For those looking for effortless no-bake PB&J quinoa cups: sweet snacks made simple, this recipe truly delivers!
Smart Snacking: Storing and Customizing Your Crunchy Creations
One of the standout features of these incredible peanut butter and jelly quinoa cups is their fantastic make-ahead potential and freezer-friendly nature. This makes them an ideal candidate for meal prep, ensuring you always have a wholesome and satisfying snack or dessert on hand.Optimal Storage for Freshness and Convenience:
Once your no-bake cups have fully set, transfer them from the muffin tin to an airtight, freezer-safe container. Storing them in the freezer is highly recommended as it not only extends their shelf life but also maintains their firm, crunchy texture, especially in warmer environments.
- Freezer Storage: These cups can be kept in the freezer for up to 3 months. When you're ready to enjoy one, simply pull it out a few minutes before eating to allow it to soften slightly, or enjoy it directly from the freezer for a firmer, almost ice cream-like treat. This long-term storage capability makes them perfect for batch cooking. If you're keen on maximizing your snack stash, explore more about how to make ahead PB&J quinoa cups: freeze for months of easy snacking.
- Refrigerator Storage: If you plan to consume them within a week, you can store them in an airtight container in the refrigerator. However, the texture might soften slightly compared to freezer storage, especially with the coconut oil becoming less firm at fridge temperatures.
Unleash Your Creativity: Customization Ideas:
While the classic PB&J combination is undeniably delicious, these quinoa cups are incredibly versatile and open to a world of personalization. Don't hesitate to experiment with these ideas to tailor them to your palate:
- Nut Butter Variations: Swap out peanut butter for almond, cashew, or even sunflower seed butter for different flavor profiles and to accommodate allergies.
- Jam Alternatives: Experiment with different jams or fruit preserves – strawberry, apricot, fig, or even a spicy pepper jelly for an adventurous twist! You could also use fresh fruit purees for a less sweet option.
- Add-ins for Texture and Flavor:
- Chocolate Chips: Mini chocolate chips (dark, milk, or white) stirred into the base mixture or sprinkled on top before chilling.
- Dried Fruit: A few raisins, dried cranberries, or chopped apricots can add extra chewiness and natural sweetness.
- Spices: A pinch of cinnamon, nutmeg, or even a tiny dash of cayenne pepper (to complement chocolate) can elevate the flavor profile.
- Coconut Flakes: Toasted or untoasted coconut flakes mixed into the base or sprinkled on top for a tropical hint.
- Topping Drizzles: Once chilled, drizzle with melted dark chocolate, a touch of extra melted peanut butter, or a sprinkle of flaky sea salt for a gourmet touch.
- Protein Boost: For an extra protein punch, you could carefully mix a scoop of unflavored or vanilla protein powder into the peanut butter mixture, ensuring it's well combined and doesn't dry out the mixture too much.
These customization options make each batch of peanut butter and jelly quinoa cups a unique experience, allowing you to cater to different tastes and dietary needs while still enjoying a wholesome and satisfying treat.
There you have it – a comprehensive guide to unlocking the sweet potential of quinoa with these delightful no-bake cups. From understanding the magic of toasted quinoa to mastering the perfect ingredient blend and exploring endless customization possibilities, these crunchy treats offer a fresh and exciting way to enjoy your favorite flavors. They are the epitome of smart snacking: easy to prepare, satisfyingly delicious, and wonderfully versatile for any occasion. Whether you're making them for a quick snack, a healthy dessert, or a convenient meal-prep solution, these peanut butter and jelly quinoa cups are sure to become a beloved staple in your kitchen. So go ahead, whip up a batch, and savor the sweet, crunchy goodness!
